Question: -4(a) How data is coordinated between multiple forms? Also write a pseudo code to add and load new forms at run time.
Answer:- coordinated between multiple forms
If you want Form2 to be able to communicate with Form1, you need to supply a reference to Form1. Once you do this, you will be set up for two-way communication, as both forms will be holding a reference to the other. The simplest way to accomplish this is to add a public variable (of type Form1) to Form2, like this:
Public Class Form2
Inherits System.Windows.Forms.Form
Public myCaller As Form1
Then, right after you create an instance of Form2 in the button click event , you can set this property.
Listing 3.21 You Can Pass a Form Reference with a Property
Dim myForm As Form2
Private Sub Button1_Click( _ ByVal sender As System.Object, _ ByVal e As System.EventArgs) _
Handles Button1.Click
If myForm Is Nothing Then
myForm = New Form2
myForm.myCaller = Me
End sub
If myForm.Show()=true then
End Sub
If code in Form2 needs to access Form1, it can now do so through the myCaller variable. Add a button to Form2 and put this code into it
Create a Windows Forms Application
- Start Visual Studio .NET or Visual Studio 2005 or a later version, and create a new Visual C# Windows Application project named WinControls. Form1 is added to the project by default.
- Double-click Form1 to create and view the Form1_Load event procedure.
- Add private instance variables to the Form1 class to work with common Windows controls. The Form1class starts as follows:
public class Form1 : System.Windows.Forms.Form
{
//Controls.
private TextBox txtBox = new TextBox();
private Button btnAdd = new Button();
private ListBox lstBox = new ListBox();
private CheckBox chkBox = new CheckBox();
private Label lblCount = new Label();
//Other code.
}
Note The code should be changed in Visual Studio 2005 or in Visual Studio 2008. When you create a Windows Forms project, Visual C# adds one form to the project by default. This form is named Form1. The two files that represent the form are named Form1.cs and Form1.designer.cs. You write your code in Form1.cs. The Designer.cs file is where the Windows Forms Designer writes the code that implements all the actions that you performed by adding controls.
Customize Form and Control Properties
- Locate the Form1_Load event procedure, and add the following code to the procedure to customize the appearance of the Form control:
//Set up the form.
this.MaximizeBox = false;
this.MinimizeBox = false;
this.BackColor = Color.White;
this.ForeColor = Color.Black;
this.Size = new System.Drawing.Size(155, 265);
this.Text = “Run-time Controls”;
this.FormBorderStyle = FormBorderStyle.FixedDialog;
this.StartPosition = FormStartPosition.CenterScreen;
2. Add the following code to the Form1_Load event procedure to customize the appearance of the Button control:
//Format controls. Note: Controls inherit color from parent form.
this.btnAdd.BackColor = Color.Gray;
this.btnAdd.Text = “Add”;
this.btnAdd.Location = new System.Drawing.Point(90, 25);
this.btnAdd.Size = new System.Drawing.Size(50, 25);
3. Add the following code to customize the appearance of the TextBox control in Form1_Load:
this.txtBox.Text = “Text”;
this.txtBox.Location = new System.Drawing.Point(10, 25);
this.txtBox.Size = new System.Drawing.Size(70, 20);
4. Add the following code to customize the appearance of the ListBox control in Form1_Load:
this.lstBox.Items.Add(“One”);
this.lstBox.Items.Add(“Two”);
this.lstBox.Items.Add(“Three”);
this.lstBox.Items.Add(“Four”);
this.lstBox.Sorted = true;
this.lstBox.Location = new System.Drawing.Point(10, 55);
this.lstBox.Size = new System.Drawing.Size(130, 95);
5. Add the following code to customize the appearance of the CheckBox control in Form1_Load:
this.chkBox.Text = “Disable”;
this.chkBox.Location = new System.Drawing.Point(15, 190);
this.chkBox.Size = new System.Drawing.Size(110, 30);
6. Add the following code to customize the appearance of the Label control in Form1_Load:
this.lblCount.Text = lstBox.Items.Count.ToString() + ” items”;
this.lblCount.Location = new System.Drawing.Point(55, 160);
this.lblCount.Size = new System.Drawing.Size(65, 15);
Add Controls to the Form
- Add the following code to add each object to the Controls array of the form at the end of Form1_Load:
//Add controls to the form.
this.Controls.Add(btnAdd);
this.Controls.Add(txtBox);
this.Controls.Add(lstBox);
this.Controls.Add(chkBox);
this.Controls.Add(lblCount);
2. Save the project.
Question:- 5(b) Explain Various drag and drop operations in VB along with events related to them.
Answer:- Drag & Drop
In computer graphical user interface drag & drop is the action of clicking on an object (virtual object on screen) and dragging it to a different location (on screen) as required.
The basic sequence involved in drag & drop is
- Press & hold down, the button on the mouse or other pointing device to “grab” the object.
- “Drag” the object /cursor/ pointing device to the desired location
- “Drop” the object by releasing the button
The drag-n-drop is programmatically done and it is widely used in creating objective type questions.
Drag and Drop Events
A drag and drop event takes places between two objects. At one object a drag is initiated and at the second object a drop takes place.
When the drag begins, the first object’s does not experience an event. VB silently handles the creation and movement of the drag icon. When the mouse is released, signalling a drop operation, the DragDrop event of the receiving control is fired and any code in that event is executed. If the DragDrop event has no code, then nothing else happens.
A second event is possible, which is the DragOver event. After a drag is initiated and at the moment the drag icon is moved over another control, that control’s DragOver event is fired. It’s only when the mouse button is released that the DragDrop event takes place on the receiving control.
The dragdrop can be very useful, users know how to use it and users see it in most of the popular shrink wrap applications. With that background, how can you not put it into your own application? Well, first of all, not every application can be made easier to use by simply tossing in some drag and drop features. In my own experience, I use drag and drop in only 1-2 out of ten programs I write. It has to add significant value to be worth the time it takes to program.
There are only two event to worry about, the DragDrop and the DragOver, so it won’t take long to cover them both. In this example, the events of a form (Form1) are examined:
Private Sub Form1_DragDrop(Source As Control, _
X As Single, Y As Single)
Private Sub Form1_DragOver(Source As Control, _
X As Single, Y As Single, State As Integer)
Both events share the common arguments Source, X, and Y, whereas the DragOver events includes the additional argument State.
- Source
This is a reference to the control which is being dragged. For example, if you drag a command button onto a form, Source refers to the command button. You would use Source.caption to refer to the caption of the command button. You can access other properties or methods of the command button the same way, by using the argument in place of the actual command button’s name. - X/Y
X and Y are the position at which the drop took place. You may use that information in a variety of ways, but if it is used at all, it is typically used to reposition the control from which the drag and drop operation began. - State
An integer value corresponding to whether the dragged object is entering or leaving the control or has simply moved its location within the control.
Drag and Drop Properties
The only two properties of a control which affect a drag and drop operation are:
- DragMode There are two settings – automatic or manual. If automatic is chosen, then all you do is drag a control (hold down the mouse while moving the cursor) and VB will automatically create the drag icon. If manual is selected, then you must invoke the .Drag method of the control for to begin the drag operation (including the display of the drag icon).
- DragIcon VB provides a default icon (a small outline image) but you may also define the icon to be used while the drag is taking place.
Drag and Drop Methods
- Drag
The only method needed is appropriately called Drag. To use it, simply use code such as:
- command1.drag
This will initiate a drag operation but as in the automatic case you still must write any code that is executed when the drop action occurs.
Question:- 5(a) “VB has rich set of library function”. Justify the statement by giving a classification of various in-built function with syntax and their use.
Answer: – We will give the syntax, discussion and examples of each of the functions listed to the left as we go down the page. We didn’t create these Access database functions so most of the syntax and usage information is taken from the Microsoft Access Visual Basic help system. We have added our own notes and discussion to help clarify the functions where we can. Let’s get started!
VBA Abs Function
The Visual Basic Abs function simply removes the sign from a number returning a positive value. This is useful for calculating the absolute difference between values and adding them differences up. You would first use the Abs function before adding the values.
This example uses the Abs function to compute the absolute value of a number.
Dim TheNumber
TheNumber = Abs(19.2) ‘ Returns the absolute value ‘19.2’.
TheNumber = Abs(-19.2) ‘ Returns the absolute value ‘19.2’.
Visual Basic Array Function for Microsoft Access
The Microsoft Access Array function establishes an array (list) of values. To create a constant array you define the array name as a variant. See below;
Dim myArray as Variant
myArray = Array(5,10,15,21)
You can then refer to an array element by its integer position starting at 1:
Msgbox myArray(2)
The Msgbox above will display the number 10
Visual Basic Asc Function
The VBA Asc function returns the ASCII character code for the 1st letter in the Asc argument:
TheNumber = Asc(“A”) ‘ Returns 65.
TheNumber = Asc(“a”) ‘ Returns 97.
TheNumber = Asc(“Avalanche”) ‘ Returns 65.
Here is a complete ASCII character chart. Visual Basic Atn Function
The arctangent is used to calculate the angles of a right triangle. It works opposite of the tangent function. While tangent will find the ratio of the two sides of a right triangle when given an angle, arctangent can find the angle given the ratio. Go here to see more information on arctangent.
This example uses the Atn function to calculate the value of pi.
Dim pi
pi = 4 * Atn(1) ‘ Calculates the numeric result for pi.
Microsoft Access Choose Function
Choose returns a value from the list of choices based on the value of index. If index is 1, Choose returns the first choice in the list; if index is 2, it returns the second choice, and so on.
Visual Basic Chr Function
The Visual Basic Chr function returns a string containing the character associated with the specified character code.
Example:
Dim MyChar
MyChar = Chr(65) ‘ Returns A.
MyChar = Chr(97) ‘ Returns a.
Visual Basic Command Function
The Visual Basic Command function returns the argument part of the command line used to invoke MS Visual Basic or an program developed with Visual Basic. The Visual Basic Command function is not available in Microsoft Office applications.
When Visual Basic is launched from the command line, any portion of the command line that follows ‘ /cmd ‘ is forwarded to the program as an argument. In the example below, cmdlineargs is the argument information returned by the Command function.
VB /cmd cmdlineargs
For applications created with Visual Basic and compiled, Command returns any arguments that appear after the name of the application on the command line. For example:
MyApp cmdlineargs
Visual Basic Conversion Functions
|
Function |
Return Type | Range for expression argument |
| CBool | Boolean | Any valid string or numeric expression. |
| CByte | Byte | 0 to 255. |
| CCur | Currency | -922,337,203,685,477.5808 to 922,337,203,685,477.5807. |
| CDate | Date | Any valid date expression. |
| CDbl | Double | -1.79769313486231E308 to -4.94065645841247E-324 for negative values; 4.94065645841247E-324 to 1.79769313486232E308 for positive values. |
| CDec | Decimal | +/-79,228,162,514,264,337,593,543,950,335 for zero-scaled numbers, that is, numbers with no decimal places. For numbers with 28 decimal places, the range is +/-7.9228162514264337593543950335. The smallest possible non-zero number is 0.0000000000000000000000000001. |
| CInt | Integer | -32,768 to 32,767; fractions are rounded. |
| CLng | Long | -2,147,483,648 to 2,147,483,647; fractions are rounded. |
| CSng | Single | -3.402823E38 to -1.401298E-45 for negative values; 1.401298E-45 to 3.402823E38 for positive values. |
| CStr | String | Returns for CStr depend on the expressionargument. |
| CVar | Variant | Same range as Double for numerics. Same range as String for non-numerics. |
Question: – 5(b) Explain how File Open common dialog box can be used to open an image file in image control? Also write some important properties of it.
Answer: – The Open and Save As dialog boxes are commonly used for opening and
saving files in most Windows applications. VBA makes these readily available for use in your applications, via the Microsoft Common Dialog Control. All you need do is add the control to the Toolbox in the VB Editor.
VBA is extremely powerful and can use many of the controls supplied with the Windows applications you have installed on your computer. A complete list of the controls available on your PC can be viewed from the Additional Controls dialog box. You can add any of these controls into your Toolbox, from which you can then drag and drop them onto UserForms in the normal way. These controls retain their full functionality, making them extremely reusable.
If you have to distribute your application, it’s best to stick with the plain-vanilla controls provided by default. Just because a control is present on your PC doesn’t mean it will be on others—unless the user has previously installed an application that uses this control.
Here are the steps for adding the Common Dialog Control (or any other controls listed on your PC) to the Toolbox. (I hope you have this control on your PC; otherwise, you’ll need to use a macro like GetNewFile to open a file and write a macro for saving a file.)
- Start a new project, open the VB Editor, and add a UserForm.
- Right-click any control from the Toolbox and choose Additional Controls from the shortcut menu. The dialog box shown in Figure 12.1 appears, containing its long list of all the controls available on your PC that can be added to the Toolbox.
- Scroll down the Available Controls list and select Microsoft Common Dialog Control version 6.0, as shown in Figure 12.1. The location of the file containing this control is displayed in the frame at the bottom. (The Caption property for this frame has changed to the selected item.)

Figure 12.1 Additional Controls dialog box
- Click OK. The CommonDialog control’s icon appears at the bottom of the Toolbox:

If you want to remove the CommonDialog control from your Toolbox, simply right-click its Toolbox button and select Delete CommonDialog from the pop-up menu.
Using the CommonDialog Control
The CommonDialog control provides a set of common dialog boxes with appropriate controls already set up. These predefined dialog boxes are used throughout most Windows applications and will be familiar to you. In this section you’ll see how to utilize the Open and SaveAs dialog boxes contained in properties of this control.
Open Dialog Box
The Open dialog box (Figure 12.2) displays the list of files and folders available from your PC, or on a disk or CD in one of the PC’s drives.

Figure 12.2 Predefined Open dialog box
The CommonDialog control has its own set of properties and methods. For example, the ShowOpen method is used to display the Open dialog box, and the Filter property can be set to restrict the types of files that will be included in the list of files. Setting the Filter property in the Properties Window to that shown in Figure 12.3 will display “All Files (*.*)” in the Files of Type box.
The Filter property can also be set in code, as follows:
![]()
Exercise 12.2 shows the effect of setting the Filter property on the File Types list in the Open dialog box.
Exercise 12.2: Showing the Open Dialog Box
Listing 12.5 shows how to set up a more complex filtering system that contains a list of filters, and how to designate one of them to be displayed in the Files of Type box when the dialog box opens.
Here are the steps for using the CommonDialog control in an application:
- If you haven’t already done so, follow the steps given at the start of the section “Displaying Open and Save As Dialog Boxes” so that you have a project with a UserForm and the CommonDialog control in the Toolbox.
- Drag and drop a CommonDialog control onto the UserForm. You can place it anywhere you like, because the control is never visible while the application is running.
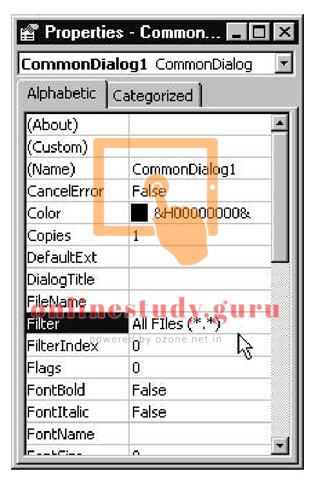
Figure 12.3 Properties window for CommonDialog1
You’ll find it impossible to resize the CommonDialog control; VBA won’t let you. When this control is placed on a UserForm during design time, it appears as a square button with its own little icon. When the UserForm is displayed to the user during run time, this control becomes invisible.
- Add a command button to the UserForm, make its Caption property Open, and make its Accelerator property O.
- Type the following statements into the command button’s Click event procedure:
GetDefaultFile Unload Me
- Enter the GetDefaultFile procedure (Listing 12.5) into the General Declarations section of the UserForm’s Code window.
- Run the application and click Open. The Open dialog box shown in Figure 12.4 appears, with the new property values. Figure 12.5 shows the list of types specified in Line 2 of the GetDefaultFile procedure.

Figure 12.4 Open dialog box with the new property settings from Listing 12.5
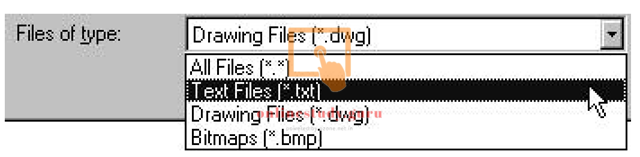
Figure 12.5 List of file types produced by Filter property setting from Listing 12.1
Listing 12.5: GetDefaultFile Procedure

This article is contributed by Tarun Jangra. Please write comments if you find anything incorrect, or you want to share more information about the topic discussed above.

